


Learning how to use Square starts with four steps: create your account, choose how you’ll get paid, set up your checkout tools, and complete your first sale. The setup you need depends on whether customers pay at a counter, through your phone, or remotely.
Before you start
Have the following ready:
- Your business name, address, contact information, and business type
- Personal information for identity verification, including your Social Security number or Individual Taxpayer Identification Number where required; registered businesses may also need an EIN and ownership information.
- Bank account details for receiving transfers
- A compatible phone, tablet, or Square POS device if you’ll accept payments in person
- Your product or service names, prices, and applicable tax settings
Square’s information requirements depend on your business structure. Follow the onboarding instructions for your business rather than assuming an EIN replaces personal identity verification.
Square quick setup: How to set up Square in four steps
Getting started with Square is quick and straightforward. You can create an account, set up your POS, and begin accepting payments in just a few steps.
The steps below explain how to set up Square for your first sale. If you only need remote payments, you can use payment links, invoices, or Virtual Terminal without configuring an in-person card reader.
Step 1: Open a Square account
Setting up your Square account is the first step to accepting payments and managing your business. The process only takes a few minutes and requires basic business information.
- Create an account: Visit the Square website or download the Square app to create a free account. You’ll need to provide basic information, including your business name, email address, and a secure password.
- Verify your business: Complete the identity verification process by providing your personal and business details, including your EIN or Social Security number for tax purposes.
- Link your bank account: Connect your business bank account to Square to ensure you receive deposits from your sales. Square offers next-day deposits as the standard option, or you can choose instant transfers for a fee.
- Customize your settings: Once your account is created, you can proceed with customizing Square according to your business profile. This includes completing your location information and sales tax settings, setting up your reporting preferences, and customizing your receipts.
Did you know that Square has the most feature-rich free POS product? Here’s what you get with a free Square account:
- Standard POS software
- Payment processing
- Payment gateway
- Waived chargeback fees
- Mobile POS app
- Basic website builder and online store
- Online ordering
- Basic invoicing
- Virtual terminal
- CRM
- Starter team management plan
- First magstripe mobile card reader:
Read more: What is Square?
Step 2: Set up your POS app
The Square app is your all-in-one tool for managing transactions, tracking sales, and accessing business insights. Because it’s app-based, you can access your account from anywhere.
To set up your Square POS app, you will need to:
- Download and log in: Install the Square app on your iOS or Android device and sign in using your account credentials.
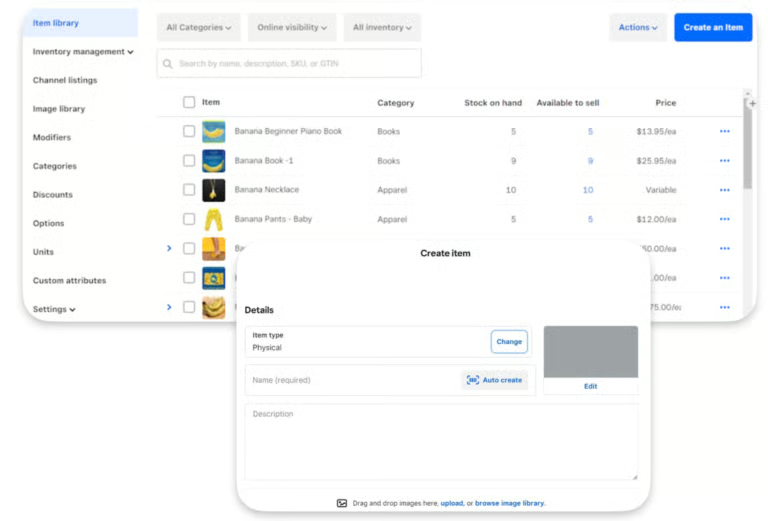
- Add items and services: Open the app, go to “Items,” and select “Create Item.” Enter the product name, price, category, and variations. Items will appear in your checkout screen for quick access. You can also upload items in bulk via CSV from the Square Dashboard.
Choose how you’ll accept payments
Choose your payment channels before buying hardware or building an online store. You can use more than one channel under the same Square account.
Payment channel | What you need | When to use it |
| In person with a reader or POS device | Compatible Square hardware and the appropriate POS setup | Counter sales, markets, restaurants, and mobile services |
| Tap to Pay on your phone | A compatible iPhone or Android phone and supported Square app | Contactless payments without a separate reader |
| Online store | A published Square website with items, fulfillment, and checkout configured | Customers browsing and ordering online |
| Payment links | A link created in Square | Collecting payments through email, text, social media, or QR codes |
| Invoices | A customer record, invoice details, and enabled payment methods | Services, projects, and payments due later |
| Virtual Terminal | A computer with a supported browser | Authorized remote payments entered by your business |
If customers will pay remotely, jump to “Square Online and ecommerce” below for the relevant setup instructions.
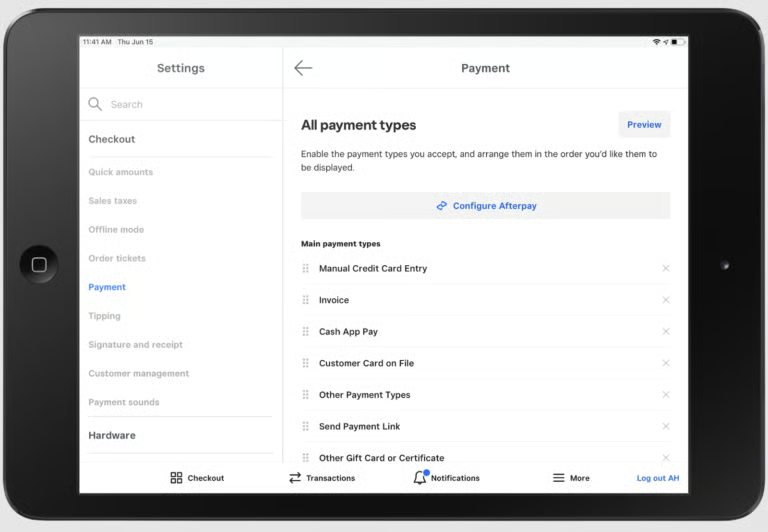
From the dashboard, go to Settings > Checkout or Payment Methods. Enable options such as credit/debit cards, gift cards, mobile wallets (Apple Pay, Google Pay), and Afterpay.
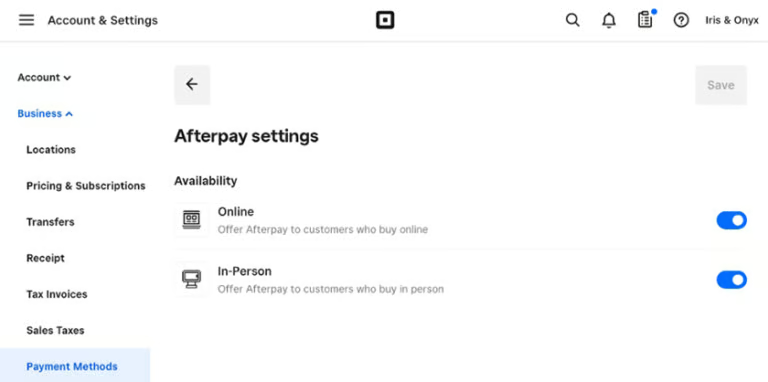
Looking to offer a Pay Later method? Afterpay is a buy now, pay later (BNPL) service integrated with Square, enabling businesses to offer Afterpay both online and in-store through Square’s payments ecosystem.
To add Afterpay as a payment method in Square, go to your Square Dashboard, click on Payments, and select Afterpay under the “Buy Now, Pay Later” section. Follow the prompts to enable Afterpay for eligible online or in-person sales. Once activated, it will automatically appear as a payment option at checkout for qualifying transactions within the supported amount range.
Step 3: Set up the Square POS app and any hardware
Here’s how to use the Square app to prepare your checkout. Download Square Point of Sale on your compatible iOS or Android device, sign in, and select the correct business location.
Add your items
In the POS app:
- Tap More > Items > All items.
- Select Create Item.
- Enter the item name and configure its price and other relevant details.
- Add an image, variations, or inventory information where applicable.
- Save the item.
You can also create items and import a larger catalog from Square Dashboard. Check that items are assigned to the locations and sales channels where you intend to sell them.
Review taxes, receipts, and payment types
Before checkout, confirm that your tax settings apply to the correct items and locations. Review your receipt’s business name and contact information, and configure tipping or discounts if needed.
To organize payment types in the POS app, tap More > Settings > Checkout > Payment types. Remove options you don’t accept and arrange the remaining methods in a useful order.
Square can also record cash and checks, but it does not move those funds for you. You receive those payments directly from the customer.
Connect your hardware or enable Tap to Pay
If you use a separate reader, pair it through the Square app’s hardware settings and follow the prompts for your model. Square Terminal, Register, and Handheld have their own setup instructions.
For phone-only contactless payments, Square supports Tap to Pay on compatible iPhone and Android devices. Check Square’s device compatibility tool before choosing this option.
On a compatible iPhone:
- Open the POS app and tap More > Settings > Account.
- Select Tap to Pay on iPhone and turn it on.
- Confirm your Apple Account and accept the setup terms.
Square currently requires an iPhone XS or newer, updated iOS, a device passcode, and an internet connection. Tap to Pay on iPhone does not work on an iPad.
Step 4: Ring up sales
Square accepts all major credit and debit cards, including Visa, MasterCard, American Express, and Discover. It also supports modern payment methods such as:
- Mobile wallets: Like Apple Pay, Google Pay, Cash App, and Samsung Pay
- Pay later: Via Afterpay
- ACH: For direct bank-to-bank payments
To process a sale:
- Open the Square app and tap Checkout
- Add items from your library or enter a custom amount
- Apply discounts or add customer details (optional)
- Tap Charge and select a payment method
- Complete the transaction and send a digital or printed receipt
(Optional) Add Square tools
To enhance your Square POS system, you can explore a range of add-on features in the Square App Marketplace or directly through your Square Dashboard. These include tools for team management, customer loyalty, marketing, inventory, and more. Once you select an add-on, you can enable it with just a few clicks and configure its settings to fit your business needs. After activation, the feature integrates seamlessly with your POS, appearing as new tabs or functions in the app interface.
Square hardware guide
Square offers a range of POS hardware designed to help businesses accept payments in-store, on the go, or at the counter. Whether you’re a mobile seller or running a full retail setup, Square’s devices are built for quick setup and seamless integration with its POS software.
Square hardware options
Hardware Option | What it does | Best fit |
| Tap to Pay on a compatible phone | Accepts contactless cards and supported digital wallets without a separate reader | Mobile sellers who want to start with their phone |
| Square Reader for contactless and chip | Accepts contactless and chip payments when connected to a compatible device | Markets, pop-ups, and mobile services |
| Square Reader for magstripe | Accepts swiped magnetic-stripe cards; it does not accept chip or contactless payments | Businesses with a specific need for swipe acceptance |
| Square Handheld | Combines portable checkout with a built-in barcode scanner | Sales-floor and tableside payments |
| Square Terminal | Combines payment acceptance with a built-in receipt printer | Countertop checkout and businesses needing portable receipt printing |
| Square Register | Provides a dedicated POS with seller and customer displays | A permanent checkout counter |
| Square Stand | Turns a compatible iPad into a countertop POS with built-in contactless and chip acceptance | Businesses that prefer an iPad checkout setup |

The Square Reader for magstripe is free for every Square account. 
The Square Reader for contactless and chip allows businesses to receive payments via dip or tap. 
The Square Terminal is an all-in-one payment device that allows you to accept payments and print receipts from anywhere in your store or on the go. 
Square Handheld features a product barcode scanner for quick, on-the-go checkout. 
The Square Register is a fully integrated POS solution with a customer-facing display for an enhanced checkout experience. 
Square Handheld features a product barcode scanner for quick, on-the-go checkout.
Setting up your Square hardware
Getting started with Square hardware is straightforward. Most devices come preloaded with the Square POS app, so you can begin accepting payments quickly after setup.
To get your device ready:
- Install the hardware: Follow the included instructions to assemble your device and connect any accessories.
- Charge the device: Ensure your hardware is fully charged before first use.
- Connect to your network: Use Wi-Fi or Ethernet (for supported devices) to connect your hardware to the internet.
- Sign in to your account: Log in using your Square credentials to sync your items, settings, and sales data.
- Pair accessories (if needed): Connect barcode scanners, receipt printers, or cash drawers via Bluetooth or USB.
- Test transactions: Run a test payment to confirm everything is working properly.
Choosing the right Square hardware
The best hardware for your business depends on how and where you sell:
Mobile businesses (pop-ups, markets, service providers) | Retail stores | Restaurants or cafes |
Mobile card readers Square Teminal | Square Handheld Square Register Square Stand | Square Terminal Square Register + Kitchen Display System |
As your business grows, you can mix and match Square devices across locations while managing everything from a single dashboard.
Square Online and ecommerce
Square provides built-in tools for accepting payments online, whether through an online store, payment links, invoices, or manual entry. These features are managed from your Square Dashboard and can be customized to fit your business needs.
Set up your online store
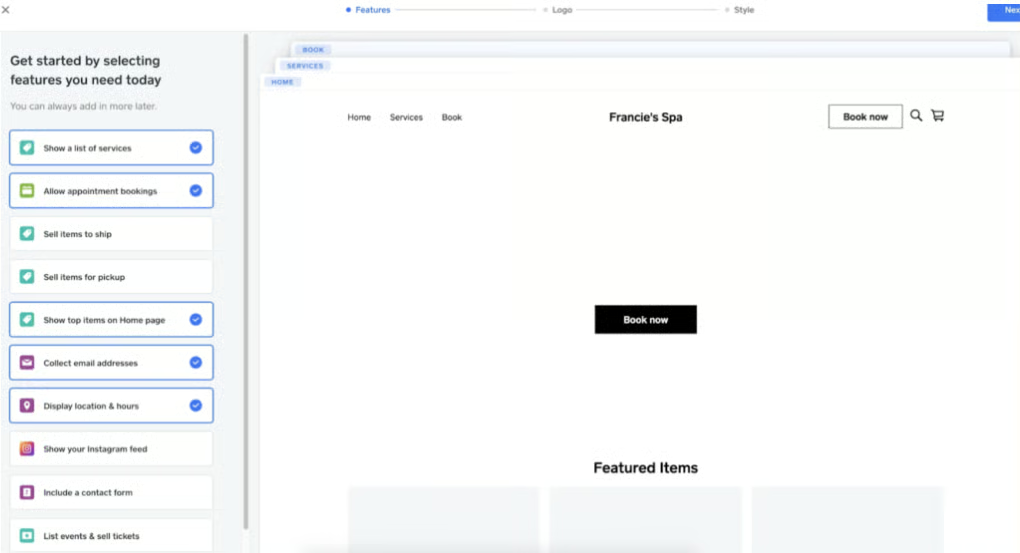
Click on “Online” from the dashboard menu to begin the setup process. You’ll be prompted to choose the type of site you want, whether it’s for retail, food and beverage, or services, and then select a design template.
From there, you can customize the layout, colors, and fonts to match your brand. You can easily import products from your existing Square item library or add new ones manually. Next, configure key features like payment methods, shipping or local pickup options, and tax settings.
Set up ecommerce checkout
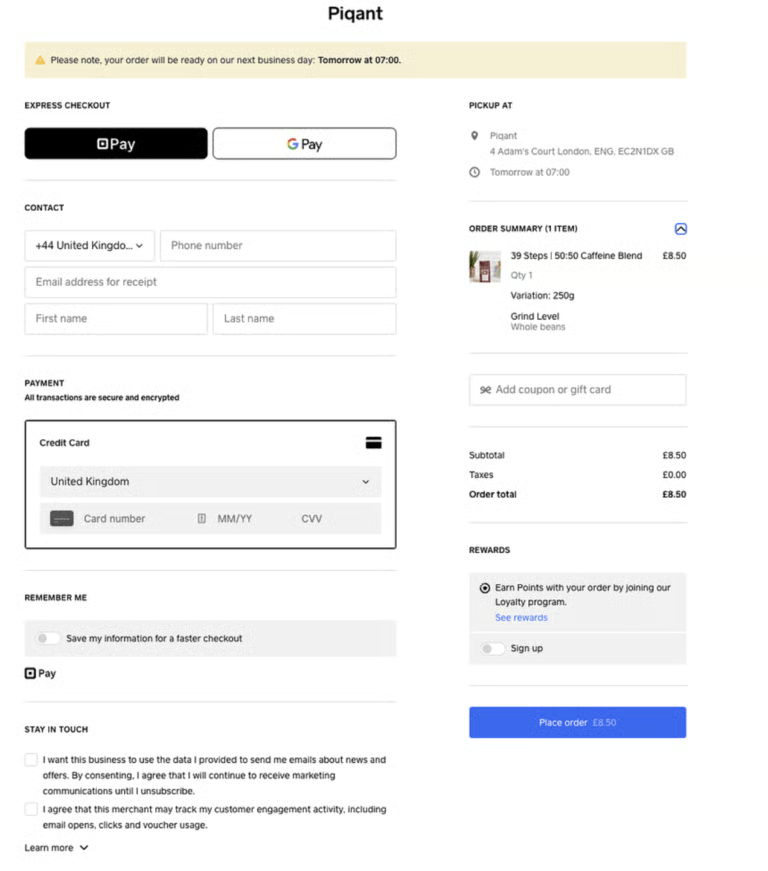
To create an ecommerce checkout with Square, navigate to your Square Online Dashboard and select Settings > Checkout. From there, you can customize the checkout page layout, select accepted payment methods such as credit cards and PayPal, and configure shipping options and rates.
Also read: Ecommerce Payment Processing: The Complete Guide
Create payment links
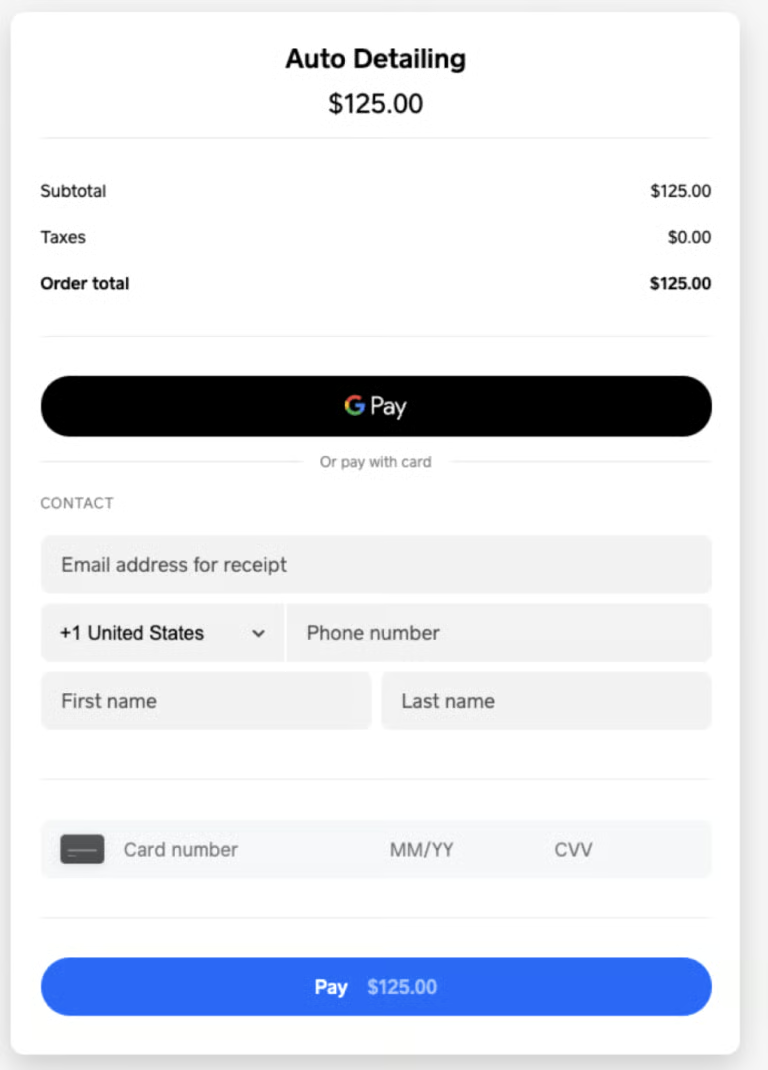
From the Online Checkout section, click on “Create Checkout Link” and choose the type of transaction you want, such as collecting a fixed amount, accepting donations, or selling a specific item. Enter the necessary details, such as item name, price, and optional customer information fields. You can customize the link with your business branding and set optional features, such as tipping or requiring contact information. Once the link is generated, you can share it via email, text, social media, or embed it on your website.
Send invoices
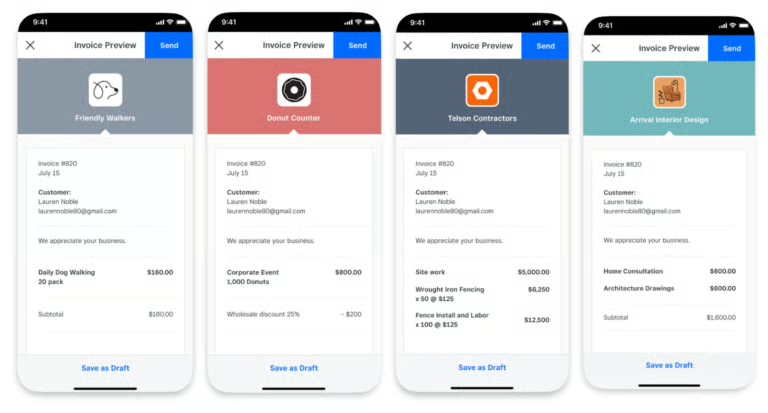
Square’s digital invoice comes embedded with a payment link that allows customers to pay remotely for goods and services. To accept credit card payments via invoice on Square, use your template to create an invoice by adding the customer’s and the transaction information. Once received, the customer can click on the Pay button, where they can choose from your available payment methods to complete the payment.
Use the virtual terminal
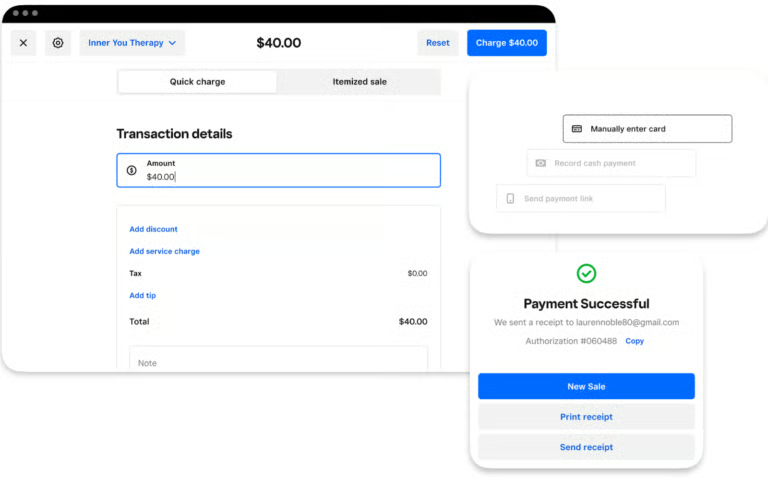
A virtual terminal is different because it allows you to process payments on behalf of your customers. Once you have received a payment request with the customer’s payment details, navigate to Square’s virtual terminal. Choose from either a quick charge or an itemized sale, then fill in the customer’s information and purchase order details. Once you’ve verified that all the details are correct, enter the customer’s credit card information to complete the transaction.
Learn more: How to Accept Payments Online
Square pricing and fees
Square’s total cost has three main parts: your software plan, payment processing, and any hardware or additional subscriptions. Start by comparing the tools you need and the payment channels you expect to use most.
In my five-plus years of reviewing POS systems and payment processors, I’ve found that Square doesn’t offer the lowest transaction fees. While its flat-rate pricing is simple and predictable, it may not be the most cost-effective option for all businesses.
Square POS plans
The current Square POS plans include the following standard subscriptions:
Plan | Monthly software fee | In-person card payments | Online card payments and invoices |
| Square Free | $0 per location | 2.6% + 15 cents | 3.3% + 30 cents |
| Square Plus | $49 per location | 2.5% + 15 cents | 2.9% + 30 cents |
| Square Premium | $149 per location | 2.4% + 15 cents | 2.9% + 30 cents |
Square Premium includes 24/7 phone support. Hardware, certain additional tools, and other charges can increase your total cost. Businesses on legacy subscriptions or custom pricing should check their account’s rates.
Square Payments processing fees
Other standard US rates include:
- Manual entry or card on file: 3.5% + 15 cents.
- Afterpay: 6% + 30 cents.
- Online API payments: 2.9% + 30 cents.
- ACH through invoices: 1%, with a $1 minimum. Square Plus and Square Premium have a $10 fee cap. Square lists no ACH processing fee for transactions deposited into Square Checking.
- Internationally issued cards: An additional 1.5% applies.
Check your actual rates in Square Dashboard under Settings > Account & Settings > Pricing & subscriptions.
Tips to minimize fees
That said, there are ways to keep costs manageable. I would focus on these practical ways to manage costs:
- Encourage card-present transactions: Swiping, dipping, or tapping a card in person typically incurs lower fees than manually entering card details.
- Minimize keyed-in payments: Stick to Square’s readers and POS devices to avoid higher fees from virtual terminals.
- Set minimum purchase amounts for cards: This helps offset fixed per-transaction fees by encouraging higher average order values.
- Consolidate transactions when possible: Bundling multiple small purchases into a single transaction reduces the impact of per-transaction fees.
- Apply for Square’s volume discount program: If your business processes over $250,000 in annual card sales with an average ticket size above $15, you may qualify for custom rates. Reach out to Square to submit an application for volume-based pricing.
Is Square worth the cost?
Square’s pricing is best suited for small businesses that value simplicity and predictable costs over the lowest possible rates. While it may be more expensive than interchange-plus providers at higher volumes, its all-in-one ecosystem, free POS software, and ease of use can offset the difference, especially for new or growing businesses.
Square Free is a practical starting point if you need basic checkout and want to avoid a monthly software subscription. A paid plan may make sense when you need its additional tools or process enough eligible payments to justify the lower rates.
Before upgrading, compare your expected monthly subscription and processing costs together. The lowest advertised transaction rate won’t always produce the lowest total bill.
Square troubleshooting tips
While Square is easy to use, occasional issues can arise. Here are some common problems and how to handle them:
Account holds or fund freezes
Some users experience account holds or delayed deposits, especially for transactions flagged as high risk. To minimize this:
- Ensure your business information is complete and up to date
- Avoid sudden spikes in transaction volume or unusually large payments
- Respond promptly to any verification requests from Square
If your account is placed on hold, contact Square support and provide any requested documentation as soon as possible to speed up the review process.
Getting customer support
Phone support depends on your plan. Square currently lists:
- Square Free: Monday through Friday, 6 a.m. to 6 p.m., Pacific time, for the first 90 days
- Square Plus: Monday through Friday, 6 a.m. to 6 p.m., Pacific time
- Square Premium: 24/7 phone support
You can also use Square’s Help Center and available chat options. Check your account for the support access included with your subscription.
Internet outages and offline payments
Supported Square hardware can accept certain payments offline, but you must configure offline payments in advance. Offline acceptance carries the risk that a payment will later decline.
Square recommends reconnecting and uploading payments within 24 hours; pending offline payments expire after 72 hours from the start of the offline session. Device-specific acceptance limits also apply. Tap to Pay on iPhone and Android does not support offline payments.
A failed or interrupted payment
If checkout stops or the payment result is unclear:
- Check Transactions for a completed, declined, or pending payment.
- Check your internet connection and the reader’s connection to your device.
- Confirm that the app and hardware are updated.
- Once you’ve confirmed the original attempt did not complete, retry or offer another payment method.
For a wider service interruption, check Square’s status page.
Square alternatives and when to switch
Square is an excellent all-in-one payment solution, especially for small businesses and startups. However, it’s not always the best fit for every business model.
If Square is not the right fit for your business needs, consider exploring alternative payment processors that better align with your pricing, support, or risk requirements.
When to consider switching from Square
Scenario | Why it matters |
| You want lower processing fees | Square’s flat-rate pricing is simple but can become expensive as your sales volume grows. Interchange-plus providers may offer better rates at scale. |
| You need more stable account handling | Some users report account holds or fund freezes, especially for high-risk or large transactions. A traditional merchant account may offer more stability. |
| You require 24/7 customer support | Square’s support is not available 24/7, which can be limiting if issues arise outside business hours. |
| You need more advanced or industry-specific features | While Square offers a strong ecosystem, some businesses may need more specialized tools or deeper customization. |
Popular Square alternatives to consider
Depending on your needs, you may want to explore:
Provider | Best for | Key advantage |
| Helcim | Lower processing costs | Interchange-plus pricing with no monthly fees and transparent rates |
| PaymentCloud | High-risk businesses | Flexible approvals and support for high-risk industries |
| Stripe | Customization and developer tools | Advanced APIs and highly customizable payment workflows |
| PayPal | Online payments and global reach | Widely recognized checkout with strong international support |
Learn more: Square alternatives
Can you run and scale your business with Square?
We’ve seen how easy it is to use Square to process credit card payments. As an all-in-one POS solution, it’s clear that small businesses can quickly start and run their operations on the platform. But can Square grow with your business?
The short answer is yes. While Square is most popular among new and small business owners, it offers a modular ecosystem that scales with your needs.
Whether you’re expanding to multiple locations or planning for long-term growth, here’s how Square supports scaling:
- Pricing that grows with you: Square’s transparent, usage-based pricing works well for businesses starting out. As you grow, you may qualify for custom rates and volume discounts, helping offset flat-rate costs.
- Scalable features across business sizes: Start with essentials like POS, inventory, and invoicing, then add advanced tools such as team management, multi-location inventory, loyalty programs, subscriptions, and marketing automation. Square also offers industry-specific solutions like Square for Restaurants and Square for Retail.
- Seamless integrations: Square integrates with over 200 third-party apps, including QuickBooks, WooCommerce, Wix, and Mailchimp. This allows you to expand your tech stack without disrupting core operations.
- Developer tools for customization: Businesses needing more flexibility can use Square’s APIs and SDKs to build custom workflows, embedded checkout experiences, or integrations with proprietary systems.
Frequently asked questions (FAQs)
Can I use Square without a card reader?
Yes. You can accept contactless payments through Tap to Pay on a compatible iPhone or Android phone. You can also accept remote payments through payment links, invoices, an online store, or Virtual Terminal without purchasing a separate reader.
How do I use Square on my phone?
Download Square Point of Sale, sign in, and complete account activation. Add your items and configure checkout, then connect a compatible reader or enable Tap to Pay. To make a sale, add an item or amount, tap Charge, and follow the payment prompts.
Is Square free to use?
Square Free has no monthly software subscription fee. Card processing fees still apply, and hardware, optional tools, and certain other services cost extra. Square Plus and Square Premium charge monthly subscription fees.
How long does Square take to deposit funds?
Under Square’s standard schedule, payments received before 5 p.m., Pacific time are generally available the next business day. Payments received after that cutoff generally arrive by the second business day. Weekends, holidays, and bank processing can affect timing. Eligible instant transfers cost an additional 1.95%.
Does Square work for online payments?
Yes, Square supports online payments through its built-in ecommerce tools. You can accept payments via an online store, checkout pages, payment links, invoices, or a virtual terminal.
Can I use Square without an internet connection?
Certain supported Square devices can accept eligible offline payments if you enable the feature beforehand. You must reconnect within Square’s upload deadline, and you bear the risk of declined or expired payments. Tap to Pay on iPhone and Android requires an internet connection.
What payments does Square accept?
Square supports major credit and debit cards, digital wallets, and other payment options, depending on your device and sales channel. ACH bank payments are available through supported workflows such as invoices. You can also record cash and checks, which customers pay directly to your business.